
Simplifying Dependency Management and Docker Builds with Pixi

Managing system dependencies for data processing applications across different environments has become increasingly complex and time-consuming, particularly when supporting geospatial workloads in EMR, Kubernetes clusters, and potential future Alpine-based lightweight containers.
Problem Statement
Managing system libraries across different Linux distributions (Amazon Linux 2023, Ubuntu, Alpine) requires different package managers and installation commands.
Duplicated dependency management code across multiple Dockerfiles increases maintenance overhead and the risk of inconsistency.
Building libraries from source is time-consuming and complex, especially when official repositories don't provide the required packages.
Security vulnerability management and patch updates across package managers require different approaches and monitoring tools.
Here are the details:
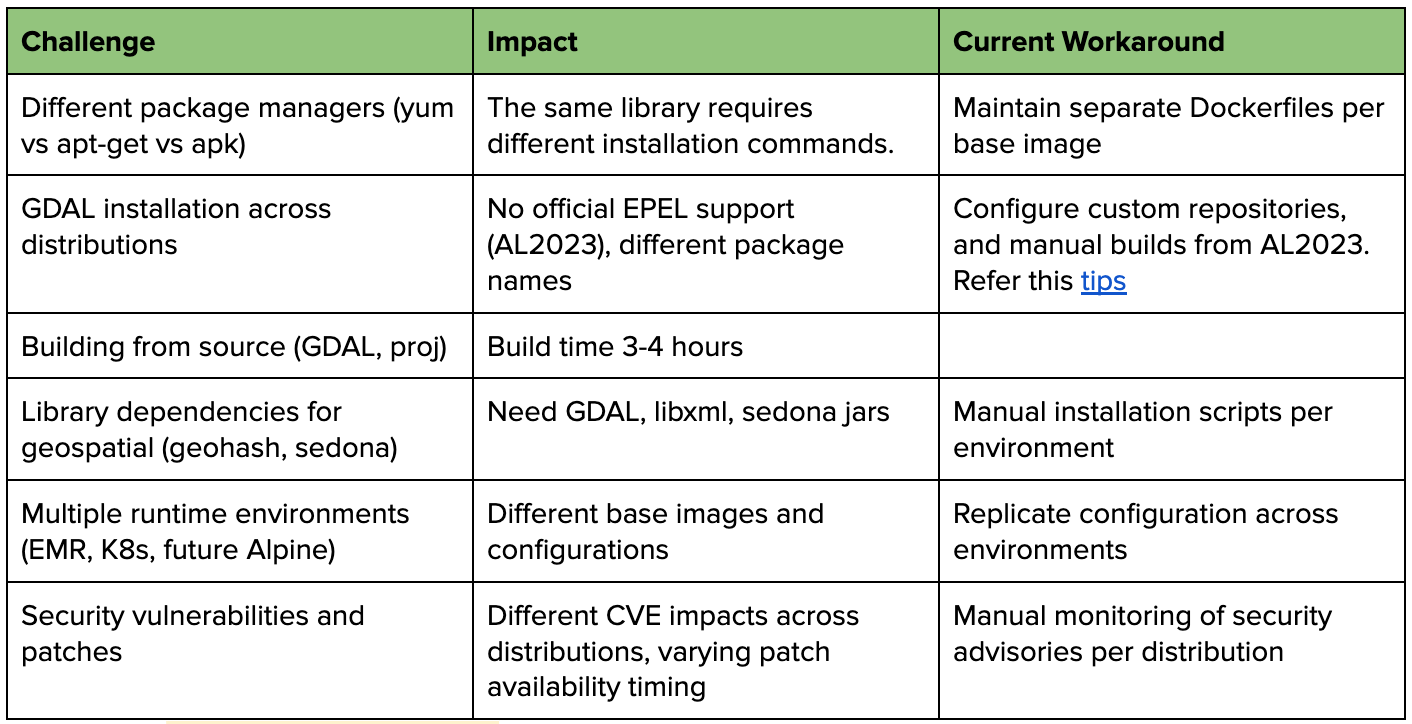
Example of varying package manager commands for the same library gdal:
Amazon Linux 2023 (yum):
yum install gdal gdal-devel
yum install mesa-libGL-devel
Ubuntu (apt-get):
apt-get install gdal-bin libgdal-dev
apt-get install libgl1-mesa-dev
Alpine (apk):
apk add gdal-dev
apk add mesa-dev
Introducing Pixi
Pixi is a modern package management and environment tool developed by Prefix.dev that leverages conda-forge to create reproducible environments across different platforms. It's designed to simplify dependency management and solve the exact challenges we outlined in our problem statement. Pixi supports Python, R, C/C++, Rust, Ruby, and many other languages.
Key Features of Pixi
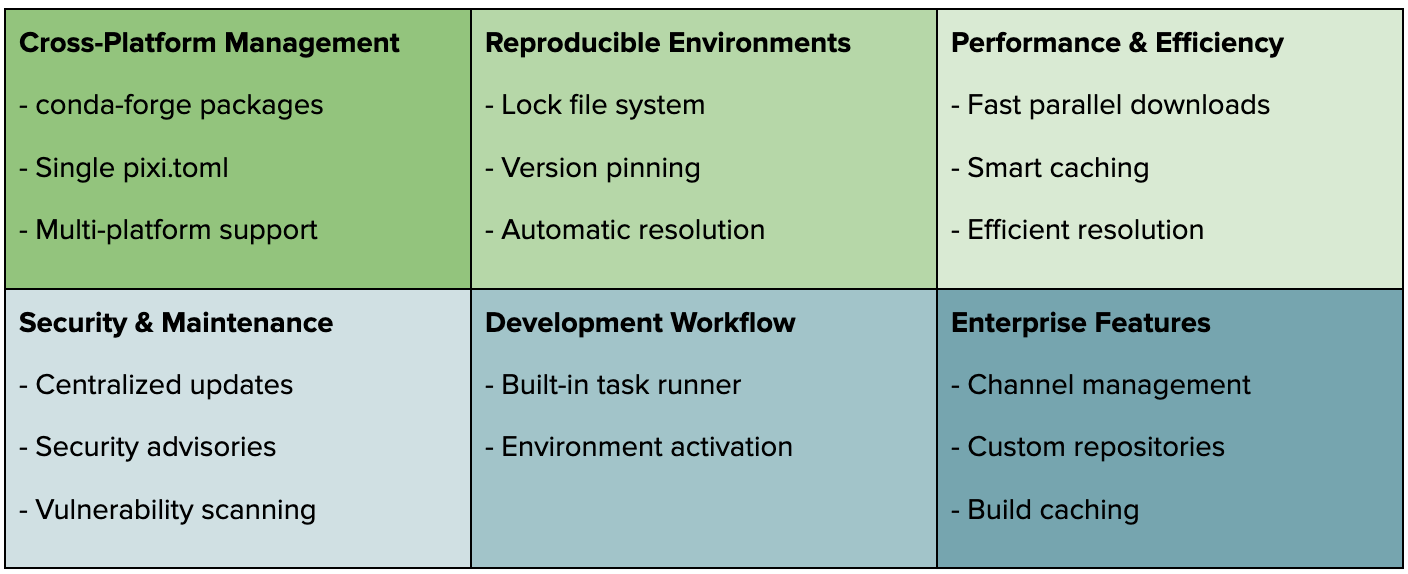
Let's explore how Pixi simplifies our dependency management challenges by providing a unified approach across different platforms and package managers, eliminating the need to maintain separate installation scripts for various Linux distributions.
Dependencies Management using Pixi
Installation and Basic Setup
Install Pixi using the official installer:
curl -fsSL https://pixi.sh/install.sh | bashFor more installation options and detailed instructions, visit the official documentation: https://pixi.sh/latest/
Initialize a new project:
pixi init my-project
cd my-project
Basic project structure:
my-project/
├── pixi.toml         # Main configuration file
├── pixi.lock         # Lock file for reproducible environments
└── .pixi/            # Local environment files
Key sections in pixi.toml
[project]
name = "my-project"
version = "0.1.0"
description = "My awesome project"

[dependencies]
python = "3.10.*"

[environments]
default = {}
Basic commands to get started
pixi install       # Install dependencies
pixi run start     # Run defined tasks
pixi shell         # Activate the environment
Let's move on to managing different types of dependencies with Pixi!
Managing Different Types of Dependencies
Pixi simplifies dependency management by leveraging conda-forge's extensive ecosystem (see more official channels here) as its foundation. This gives us access to thousands of pre-built packages across different platforms, eliminating the need to maintain separate installation commands for yum, apt-get, or apk. All dependencies - from system libraries to Python packages - can be defined in a single pixi.toml file. Here's how Pixi manages different types of dependencies:
conda-forge dependencies
[dependencies]
curl = "*"
libcurl = "*"
libxml2 = "*"
libxslt = "*"
python = "3.10.*"
wget = "*"
awscli = "*"
numpy = "==1.23.5"
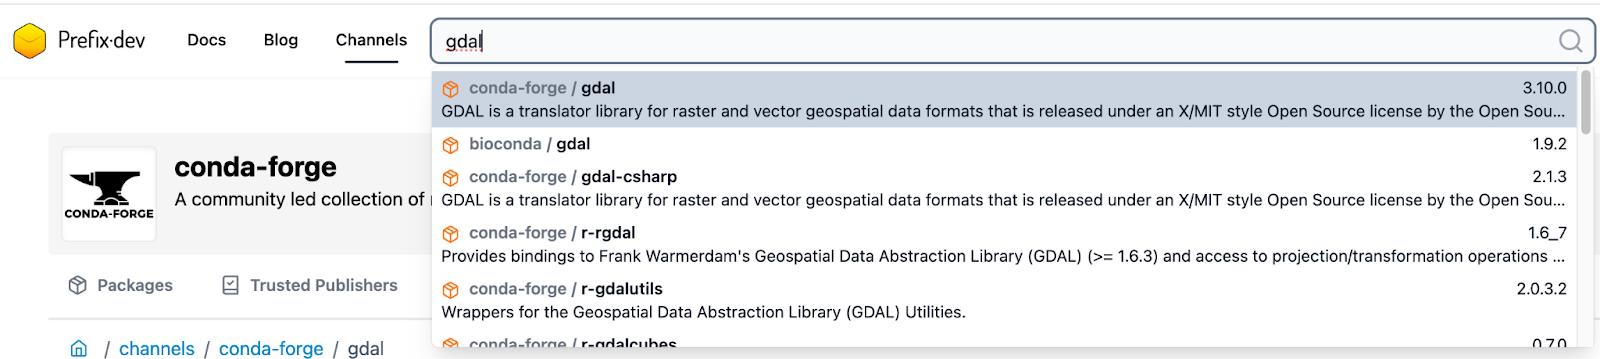
s3fs = "==2024.10.0"While package names differ between package managers (gdal-devel in yum vs libgdal-dev in apt), conda-forge provides unified package names. You can easily find the correct package name by searching the conda-forge channel at https://prefix.dev/channels/conda-forge. For example, search gdal
PyPI packages (for packages not available in conda-forge)
[pypi-dependencies]
your-custom-sdk = "==2.0.12"
...

# Install from source git repo
fasttext = { git = "https://github.com/facebookresearch/fastText" }
Host dependencies
Host dependencies are the tools and libraries needed during the build process but not required at runtime. A common use case is rebuilding Python wheels for specific Python versions:
# Dependencies needed during build time
[host-dependencies]
gcc = "12.*"
cmake = "3.27.*"
make = "4.3.*"
When Pixi runs tasks that require building packages:
Host dependencies are installed first
Build tools become available during the build process
The built environment includes all necessary compilers and tools
The resulting wheels are compatible with the specified Python version
Find out details about dependency type at https://pixi.sh/latest/build/dependency_types/
Environment Management
Multiple environment configurations
Pixi allows us to define multiple environments in a single pixi.toml file, making it easy to manage different dependency sets for development, testing, and production:
[environments]
# Test environemnt with additiona dependencies just for testing
test = { features = ["dev"], solve-group = "prod" }
# Production environment stable [dependencies]
prod = { features = [], solve-group = "prod" }
# Geo environment with specified dependencies for geospatial
geo = { features = ["geo"], solve-group = "prod" }

...

[feature.dev.dependencies]
pytest = "*"
ruff = "*"
pyyaml = "*"
maven = "*"

...

[feature.geo.dependencies]
gdal = "*"
libxml2 = "*"
mesalib = "*"
geos = "*"
apache-sedona = "==1.7.0"
To activate specific environments:
pixi shell --environment test    # Activate test environment
pixi run --environment test      # Run commands in test environment
pixi install --environment geo   # Install base + geo dependencies
Custom channels and repositories
We use "conda-forge" as the default channel, but Pixi also allows us to add more public/private channels. Here's how to configure channels in your pixi.toml:
[project]
...
channels = [
        "conda-forge"     # For default channel
        "bioconda",       # For biology packages
        "pytorch",        # For PyTorch packages
        "nvidia",         # For CUDA packages
]
Another common scenario is managing PyPI packages hosted on internal or private servers. Pixi provides flexible configuration options for multiple PyPI sources and control package resolution strategies. Here's how to configure private PyPI repositories in your pixi.toml:
[pypi-options]
# list of additional urls
extra-index-urls = [
    "https://your-company.gitlab.com/api/v4/projects/1000/packages/pypi/simple",
    "https://your-company.gitlab.com/api/v4/projects/1001/packages/pypi/simple"
]
index-strategy = "unsafe-best-match"
Yes! The PyPI configuration in Pixi looks familiar because it leverages uv, another Rust-based Python package manager, to resolve and build Python dependencies. You can learn more about uv's impressive performance and capabilities in this blog post: speed-showdown-pip-compile-vs-uv
Platform Management
Pixi allows us to specify different dependencies and build configurations based on target platforms:
[project]
...
platforms = ["osx-arm64", "linux-64", "linux-aarch64"]
...
By default, Pixi will search for package versions that support all platforms specified in the platform's key, ensuring cross-platform compatibility in your builds.
When needed, we can specify platform-specific dependencies. For example, to handle g++ (gxx) across different platforms:
# Linux uses gxx package
[target.linux-64.dependencies]
gxx = "*"

[target.linux-aarch64.dependencies]
gxx = "*"

# macOS uses clang from llvm package
[target.osx-64.dependencies]
llvm = "*"
Docker Builds with Pixi
The idea is to build a transit Docker image to manage dependencies and then copy only the necessary packages to our final production image.

Let’s dive into how to implement this approach and solve our cross-platform packaging challenges.
Define Dependencies Stage
As shared in previous sections of this blog, we manage all common and environment-specific package dependencies in the pixi.toml file. This centralized configuration ensures consistent dependency management across different platforms and environments:
[project]
platforms = ["osx-arm64", "linux-64", "linux-aarch64"]
channels = ["conda-forge"]
...

[dependencies]
curl = "*"
libcurl = "*"
libxml2 = "*"
libxslt = "*"
python = "3.10.*"
wget = "*"
awscli = "*"
numpy = "==1.23.5"
s3fs = "==2024.10.0"
...

[pypi-dependencies]
your-custom-sdk = "==2.0.12"

...

[feature.geo.dependencies]
gdal = "*"
libxml2 = "*"
mesalib = "*"
geos = "*"
apache-sedona = "==1.7.0"
...

[environments]
prod = { features = [], solve-group = "prod" }
geo = { features = ["geo"], solve-group = "prod" }
...
Transit Image Stage
Pixi offers two methods for deploying packages across systems:
Docker-based deployment (which we're using here)
pixi-pack for creating relocatable environments (similar to conda-pack). For details, refer to this https://pixi.sh/latest/advanced/production_deployment/
For our Docker builds, we use the Docker-based approach to create a transit image (tag: runtime/base) that manages all dependencies:
FROM ghcr.io/prefix-dev/pixi:0.39.2

# copy source code, pixi.toml and pixi.lock to the container
WORKDIR /app
COPY runtime/base/pixi.toml /app/

# install dependencies to `/app/.pixi/envs/prod`
RUN pixi install -e prod

# create the shell-hook bash script to activate the environment
RUN pixi shell-hook -e prod -s bash > /shell-hook
RUN echo "#!/bin/bash" > /app/entrypoint.sh
RUN cat /shell-hook >> /app/entrypoint.sh
# extend the shell-hook script to run the command passed to the containercd
RUN echo 'exec "$@"' >> /app/entrypoint.sh
RUN chmod 755 /app/entrypoint.sh

# Set the entrypoint
ENTRYPOINT ["/app/entrypoint.sh"]
All dependencies are now installed in /app/.pixi/envs/prod:
Linux binaries
Python site-packages
System libraries
Multi-stage Build Stage
The key technique here is using the transit image as a reference and strategically copying only the necessary dependencies:
# Reference our transit build
FROM runtime/base as transit

# Copy the entire pixi environment from the transit image
COPY --from=transit /app/.pixi/envs/prod /app/.pixi/envs/prod
...
Final Image Stage
This stage demonstrates the complete multi-stage build process and our strategy for maintaining different specialized images. Here's how it looks with EMR and other bases:
Standard Image
# Reference our transit builds
FROM runtime/base as transit

# Final image for standard use case
FROM public.ecr.aws/emr-on-eks/spark/emr-7.2.0:latest
COPY --from=transit-base /app/.pixi/envs/prod /app/.pixi/envs/prod
...

ENV PATH="/app/.pixi/envs/prod/bin:${PATH}"
ENV LD_LIBRARY_PATH="/app/.pixi/envs/prod/lib:${LD_LIBRARY_PATH}"


# Other setup specified for standard and EMR base
...
Geo Image
# Reference our transit builds
FROM runtime/geo as transit

# Final image for geo use case
FROM public.ecr.aws/emr-on-eks/spark/emr-7.2.0:latest
COPY --from=transit-base /app/.pixi/envs/geo /app/.pixi/envs/geo
...

ENV PATH="/app/.pixi/envs/geo/bin:${PATH}"
ENV LD_LIBRARY_PATH="/app/.pixi/envs/geo/lib:${LD_LIBRARY_PATH}"


# Other setup specified for geo and EMR base
Machine Learning Image
# Reference our transit builds
FROM runtime/ml as transit

# Final image for ml use case
FROM public.ecr.aws/emr-on-eks/spark/emr-7.2.0:latest
COPY --from=transit-base /app/.pixi/envs/ml /app/.pixi/envs/ml
...

ENV PATH="/app/.pixi/envs/ml/bin:${PATH}"
ENV LD_LIBRARY_PATH="/app/.pixi/envs/ml/lib:${LD_LIBRARY_PATH}"


# Other setup specified for ml and EMR base
The same pattern works for any base image while maintaining:
Consistent dependency management
Optimized image sizes
Specialized variants for different workloads
Easy maintenance across all base images
Conclusion
Through exploring Pixi for dependency management and Docker builds, we've demonstrated how to solve complex cross-platform dependency challenges with a streamlined approach. By leveraging Pixi's powerful features like unified package management, environment handling, and custom channel support, combined with an efficient multi-stage Docker build strategy, we can maintain consistent builds across different Linux distributions while optimizing our final images.
This solution not only simplifies dependency management with a single pixi.toml configuration but also enables modular, specialized images for different workloads (standard, geo, ML) while reducing maintenance overhead and improving build performance.
As we look to the future, this foundation will allow us to support additional base images like Alpine, new specialized workloads, and enhanced CI/CD integrations, making our dependency management robust and scalable.